Assignment 4: Enmeshed in 3D
Milestone 1: Due Thursday, March 2nd, before midnight
Milestone 2: Due Thursday, March 16th, before midnight
Milestone 3: Due Thursday, March 23rd, before midnight
The goals for this assignment are:
-
Implement an interactive model viewer with an orbit camera
-
Read and display meshes in PLY file format
-
Implement blinn-phong materials using shaders
-
Try importing your own models, creating a unique scene, adding interactive controls, and/or implementing your own effects and shaders
Getting started
Fork the repository at https://github.com/BrynMawr-CS313-S23/mesh-viewer
Clone your copy of the repository to your own computer. To build,
don’t forget to do an "out of source" build and run cmake .. from the /build directory!
$ git clone git@github.com:<username>/mesh-viewer.git
$ cd mesh-viewer
$ mkdir build
$ cd build
$ cmake ..
$ make (or start mesh-viewer.sln)
$ ../bin/test-ply-mesh (or ../bin/Debug/test-ply-mesh from the developer console in Visual Studio)
$ ../bin/mesh-viewer (or ../bin/Debug/mesh-viewer from the developer console in Visual Studio)| Your basecode uses the GLM math library for vectors, points, and colors (which have types for glm::vec3 and glm::vec4). |
Mesh viewer
Implement an application that can preview the meshes in the /models directory.

Controls
-
n or N goes to the next model
-
p or P goes to the previous model
-
s or S cycles through different shaders: unlit, normals, per-vertex phong, and per-pixel phong
-
Left-click-drag orbits the camera around the model
-
Middle-mouse wheel, or SHIFT-left drag zooms in and out
Features/Requirements
-
When loading a model, your must ensure that the model fits inside in the view volume. In other words, you should scale and translate the model to make sure it fits in the camera’s view volume.
-
Your model should be rendered with phong-blinn shading by default, although you can add keyboard controls to switch to other rendering styles.
-
Your viewer should support "orbit" camera controls by default, although you can add other types of camera controls as an extension.
-
Your mesh class should be able to load an indexed triangle mesh from a PLY file.
-
Your Mesh class should not contain memory errors, such as leaked memory or out-of-bounds buffer read/writes.
Milestone 1
Due March 2nd
The goals of milestone 1 are
-
to load indexed triangle meshes from a PLY file
-
to display the mesh in 3D
-
to implement an orbit camera that allows us to look at the mesh from different angles
-
to preview a series of models loaded from a directory
PLYMesh class
In the file plymesh.cpp, complete the implementation of the PLYMesh class. Your class needs to
-
represent triangles as an indexed mesh
-
load the PLY file format
-
compute the axis-aligned bounding box for its vertices. An axis-aligned bounding box consists of
-
the minimum values of x, y, and z
-
the maximum values of x, y, and z You can compute the minimum and maximum values when you load the PLY file.
-
For this milestone, the mesh class must implement the following API:
-
PLYMesh()
-
virtual ~PLYMesh()
-
load(const std::string& filename)
-
minBounds()
-
maxBounds()
-
numVertices()
-
positions()
-
normals()
-
colors()
-
uvs()
-
numTriangles()
-
indices()
Feel free to add additional methods as needed. Some of the above vertex attributes, such as normals and texCoords, might be unfamiliar to you. We will talk more about these in upcoming weeks. For now, simply read and store these quanities.
Getting Started
Your basecode shows you how to implement an indexed mesh using std::vector and an existing helper class
agl::TriangleMesh. The helper class implements code that interfaces your specified mesh information with
the graphics card using OpenGL.
Testing
To test your PLYMesh, make sure that the test application test-ply-mesh can run without errors.
This test application loads a small PLY file containing a single triangle.
$ mkdir build
$ cd build
$ cmake ..
$ make (or start mesh-viewer.sln)
$ ../bin/test-ply-mesh
This mesh has 3 vertices
Max bounds:   1.000000,   1.000000,   0.000000
Min bounds:  -1.000000,  -1.000000,   0.000000

Positions:
  1.000000,  -1.000000,   0.000000
 -1.000000,  -1.000000,   0.000000
  0.000000,   1.000000,   0.000000

Normals:
  0.000000,  -0.000000,  -1.000000
  0.000000,  -0.000000,  -1.000000
  0.000000,  -0.000000,  -1.000000

Indices:
0 1 2
PLY File Format
Your PLYMesh needs to load mesh information from a PLY files.
Information about the PLY file format can be found here: PLY files.
| PLY files can store different amounts of data for each vertex. Below, each vertex has a position and normal. But it’s possible for each vertex to also store additional information, such as UVs (e.g. texture coordinates) and colors. For this assignment, assume that all PLY files have positions and normals only. |
ply
format ascii 1.0
element vertex 4
property float32 x
property float32 y
property float32 z
property float32 nx
property float32 ny
property float32 nz
element face 3
property list uint8 int32 vertex_indices
end_header
-0.001 0.002 0.070 1.000 0.000 0.000
-0.009 0.044 0.088 1.000 0.000 0.000
-0.01 0.033 0.09 1.000 0.000 0.000
-0.023 0.031 0.082 1.000 0.000 0.000
3 0 1 2
3 2 3 1
3 3 0 2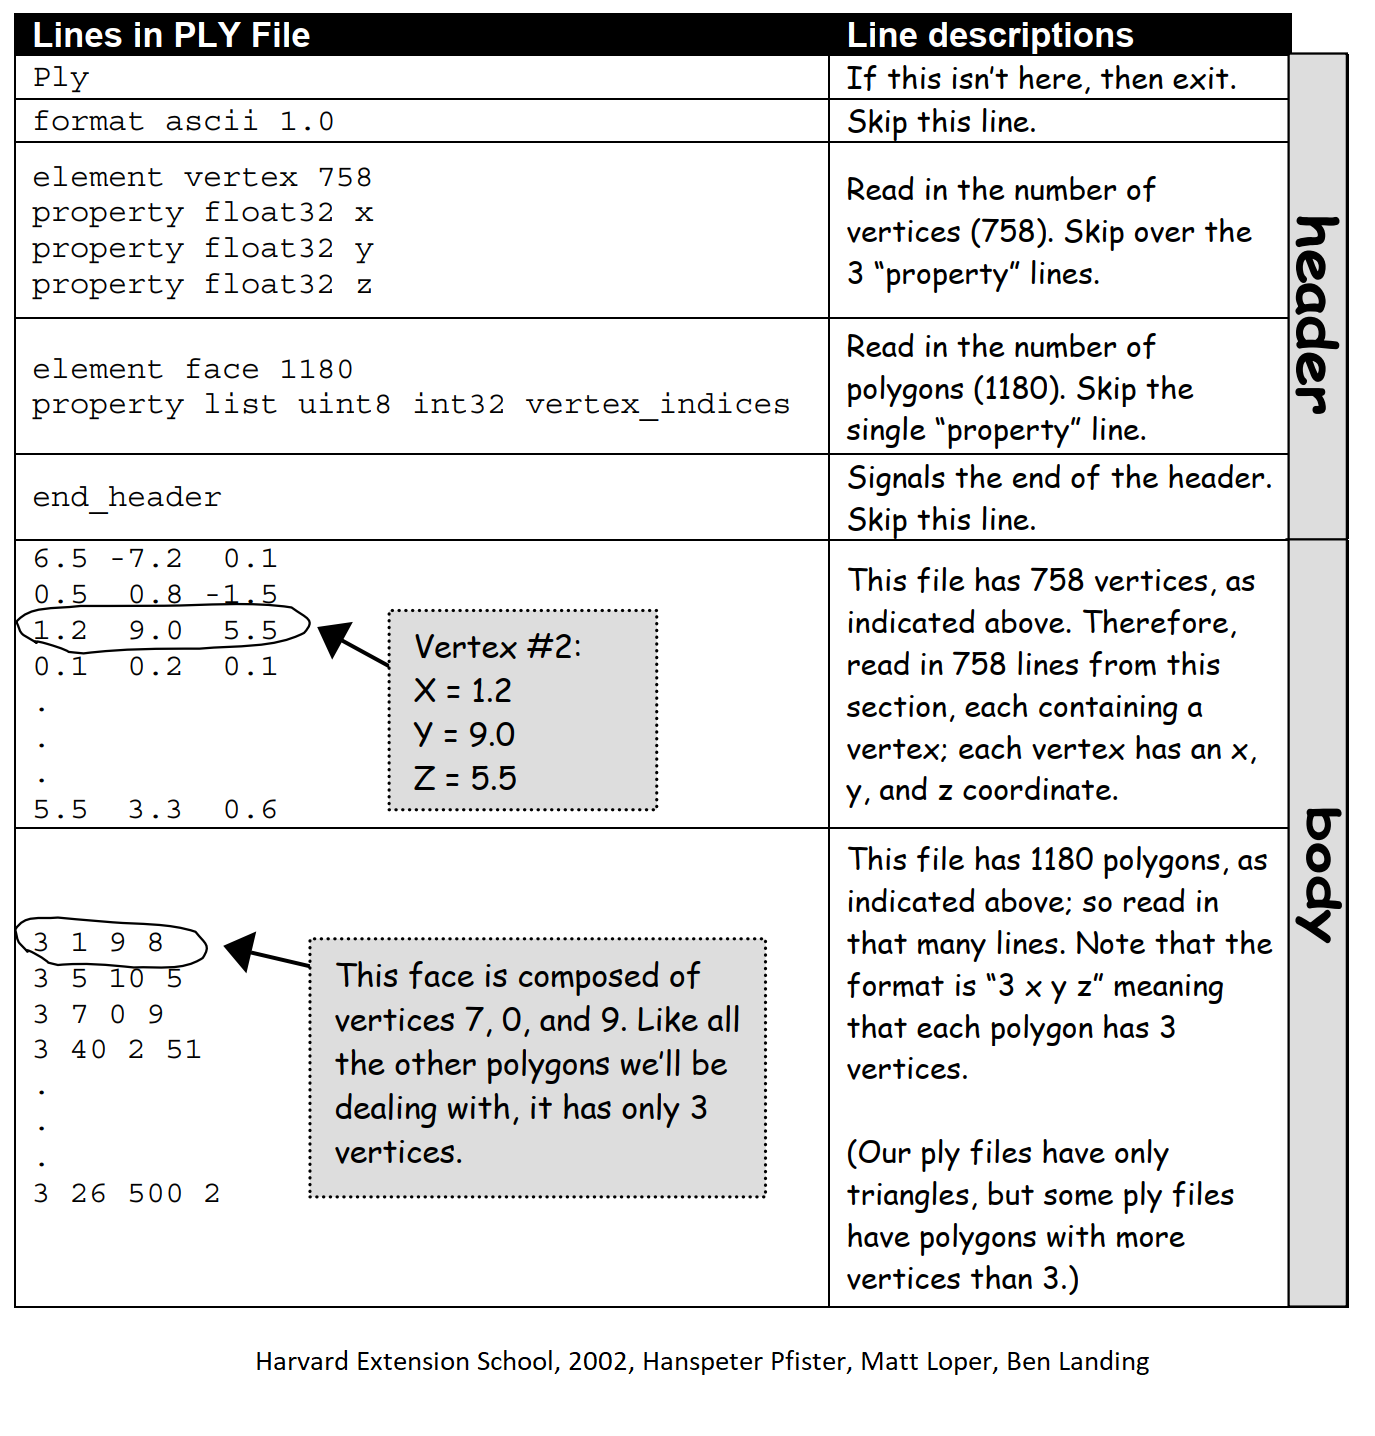
3D View
In the file mesh-viewer.cpp, visualize your PLY file in 3D! When you first open mesh-viewer.cpp, you will see the following basecode. It is simular
to what you used in Assignment 01.
class MeshViewer : public Window {
public:
   MeshViewer() : Window() {}
   void setup() {
      // Below is an example of how to load a PLYMesh
      mesh.load("../models/cube.ply");
   }

   // Override these methods to respond to user events
   void mouseMotion(int x, int y, int dx, int dy) {}
   void mouseDown(int button, int mods) {}
   void mouseUp(int button, int mods) {}
   void scroll(float dx, float dy) {}
   void keyUp(int key, int mods) {}

   void draw() {
      float aspect = ((float)width()) / height();
      renderer.perspective(glm::radians(60.0f), aspect, 0.1f, 50.0f);
      renderer.lookAt(eyePos, lookPos, up);

      renderer.translate(vec3(0, 0, 0));
      renderer.rotate(vec3(0, 0, 0));
      renderer.scale(vec3(1, 1, 1));
      renderer.mesh(mesh); // this line draws the mesh, affected by the given transforms
      // renderer.teapot(); // you can try built-in meshes for testing
   }

protected:
   PLYMesh mesh;
   vec3 eyePos = vec3(10,0,0);
   vec3 lookPos = vec3(0,0,0);
   vec3 up = vec3(0,1,0);
};

int main(int argc, char** argv)
{
   MeshViewer viewer;
   viewer.run();
   return 0;
}
Assignment 01 displayed 2D graphics. In this assignment, we initialize our window for 3D graphics. The methods for responding to
user input, such as mouse and keyboard, works exactly the same. To get started, try experimenting with the lookAt(), translate(), rotate(), scale()
calls in draw().
-
lookAt()changes the camera position and orientation -
translate()applies a translation transformation -
rotate()applies a rotation transformation -
scale()applies a scale transformation
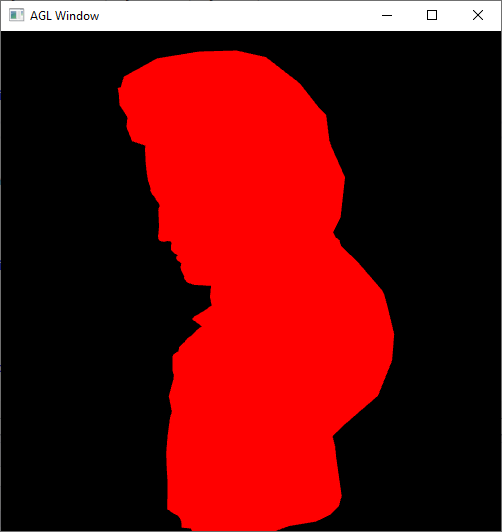
After this step, you should see a red cube centered on a black screen.
Requirements/Hints:
-
Your program should center the loaded model at (0,0,0)
-
Your program should resize the model so it fits within a 10x10x10 view volume.
-
If the mesh is not loaded correctly, or positioned correctly, you will only see a black screen. Try displaying a default mesh to deubg problems with the view.
Swapping models
Implement a feature to cycle through all the models in the /models directory. You can load all the filenames from the /models dorectory using the
function call GetFilenamesInDir("../models", "ply"), which is defined in osutils.h.
-
Pressing 'n' or 'N' should show the next model in the list
-
Pressing 'p' or 'P' should show the previous model in the list
After this step, you should be able to scroll through each model. They will all show with a solid color (no shading!):
Camera controls
Implement orbit camera controls in mesh-viewer.cpp. Extend the MeshViewer to update the following camera attributes based on the user’s input.
-
position
-
backward direction
-
up direction
-
right direction
Using the algorithm from class, you should keep track of the radius, current elevation (up/down angle) and azimuth (left/right angle) to compute the camera’s position (x,y,z). The forward direction will then be (position - originPos) since the model will be centered at the origin. You can then compute up and right using cross products. To move forward and backward, you simply need to change the radius of the sphere.
x = Radius * sin(Azimuth) * cos(Elevation)
y = Radius * sin(Elevation)
z = Radius * cos(Azimuth) * cos(Elevation)
Milestone 2
Due March 16th
In the previous milestone, the mesh was rendered with a flat color and wireframe. In this milestone, you will implement
three shaders and augment your mesh-viewer.cpp to switch between them.
-
The 's' or 'S' key should cycle to the next shader
In your basecode, you need to load your shaders in setup() and then specify the current shader you are using in draw().
void setup() {
renderer.loadShader("normals", "../shaders/normals.vs", "../shaders/normals.fs");
renderer.loadShader("phong-vertex", "../shaders/phong-vertex.vs", "../shaders/phong-vertex.fs");
renderer.loadShader("phong-pixel", "../shaders/phong-pixel.vs", "../shaders/phong-pixel.fs");
// etc
}
void draw() {
renderer.beginShader("normals"); // activates shader with given name
// all primitives draw here will use the current shader
renderer.endShader();
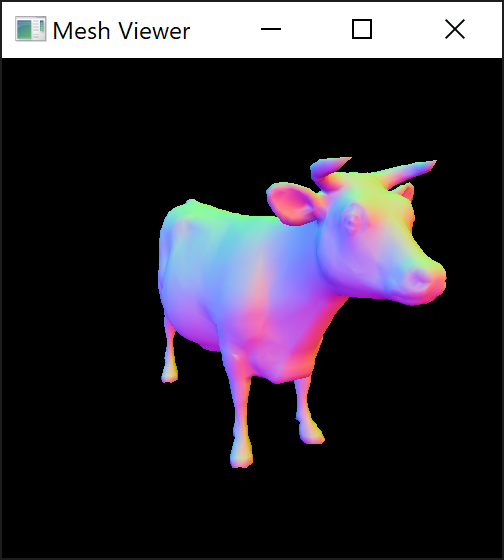
}Normals shader
In normals.vs and normals.fs, implement vertex and fragment shaders that uses the normals of your mesh to color the surface.
This shader visualizes the normals that were loaded with your PLY file. The color of each pixel is determined by the value of the normal at that point.
Normals have unit length, so each component will be in the range [-1,1]. Colors need to be in the range [0,1], so re-map each component of the
normal to the range [0,1].
Per-vertex Phong shader
In phong-vertex.vs and phong-vertex.fs, implement vertex and fragment shaders that perform per-vertex phong shading.

Per-pixel Phong shader
In phong-vertex.vs and phong-vertex.fs, implement vertex and fragment shaders that perform per-vertex phong shading.
Milestone 3
Add at least two features to your mesh-viewer.cpp.
-
Add new PLY files to your viewer. You can use Blender to export PLY files. You can try finding a free model online and converting to PLY, or even create a model of your own! Be sure to credit the artist if you use someone else’s work.
-
Implement your own shader: you might try toon shading, procedural textures, or color effects
-
Try animating the vertices of the model in your vertex shader
-
Support textures. Load UV coordinates and pass them to your shader along with an image.
-
Animate the light source, or add additional light sources.
-
Load multiple models at once and create a unique scene
Below are some example shaders: toon shading, animated vertices, and polka dots
Update Readme.md
Update Readme.md to include documentation on your unique features and images created with your mesh-viewer.
What to hand in
-
Your code. Make sure your code is checked into github
-
One or more images or gifs created using your software
-
Update
Readme.mdso it includes a writeup of the features your application supports. Make sure to include images or videos. Be sure to point out any original features that you implement.
Grading rubric
Grades each week are out of 4 points.
-
(4 points) Milestone #1
-
(1 points) Correct implementation of the PLYMesh interface
-
(1.5 points) Displaying the mesh in 3D
-
(0.5 points) Switch models
-
(1 points) Camera controls
-
-
(4 points) Milestone #2
-
(1.0 points) Unlit shader
-
(1.5 points) Per-vertex phong shading
-
(1.5 points) Per-pixel phong shading
-
-
(4 points) Milestone #3
-
(2.0 points) no memory errors
-
(1.0 points) readme and unique images/demos
-
(0.2 points) style and header comment
-
(0.8 points) unique features
-
Code rubrics
For full credit, your C++ programs must be feature-complete, robust (e.g. run without memory errors or crashing) and have good style. Some credit lost for missing features or bugs, depending on severity of error
-5% for style errors. See the class coding style here. -50% for memory errors -100% for failure to checkin work to Github -100% for failure to compile on linux using make